Top Stories

Ankaj Gupta
October 10, 2021
How do I get the Yelp Fusion API Key | How to get Yelp API Key

# In this article you will learn, How to create a new yelp account and How do you get the Yelp Fusion API Key.

What is Yelp API?

The Yelp Fusion API allows users to get local content and user reviews from millions of businesses, such as the restaurant, hospitality and service industries in 32 countries. Yelp content may be used for app and website development purposes.

How do I get the Yelp Fusion API Key | How to get Yelp API Key

# How to Create a Yelp Account

Step 1: Go-to yelp developers portal

To continue with Yelp API, First you need to visit the Yelp developers portal.Yelp developers portal

Yelp developers portal

Step 2: Create a Yelp Account.

You can continue to work with the Yelp service through a Facebook, Google, or Apple account. Another option is to sign up with your email address.

Note : You have to verify that you are not a robot by filling the recaptcha.

Now your account is successfully created.

Step 3: Verify email id

In this case you will receive a confirmation email - don't forget to follow the link in it to verify your account.

yelp verify email

# How do I get the Yelp API Key

Step 1: Get started with Fusion API

Once you are logged into the Yelp Developers service, first scroll to the bottom of the page and hit the Explore Yelp Fusion button.

Explore Yelp Fusion

Step 2: Create an App

First, log in to the Developers Portal with your existing Yelp account or create a new one.

How do I get the Yelp Fusion API Key | How to get Yelp API Key

Create your first Yelp app to receive your personal Yelp fusion API Key and fill in the required fields in the form, agree to the Yelp API Terms of Use and performance requirements. Then prove you're a human, and press Create New App button.

yelp api form | Create the Yelp App | Yelp Fusion API Key

Step 3: Get your Client ID and API Key.

After submitting the form, you will get your Client ID and API Key. Save them to start working with your app.

Get yelp Client ID and API Key | Yelp Fusion API Key

Note : Remember to keep your personal Yelp API Key with yourself! This is the credential for your calls to Yelp's API and must be used only by you.

API Yelp Fusion
Read more
Ankaj Gupta
October 02, 2021
How to fetch single column from database in Django | Django values_list querysets

# In this section you will learn, How to fetch single OR column data from database in Django ORM.

django values_list querysets | How to fetch single column from database in Django | How to select a single field from database with django QuerySet

Select a single field from database with django QuerySet.

In django with the help of ' values_list() 'method you can fetch single or more column datafrom database.

Your "posts" models is like this :

  ➤ Example : models.py;

class Posts(models.Model):
    title = models.CharField(max_length=100)
    description = models.TextField(max_length=155)
 	
    class Meta:
        verbose_name_plural = "Posts"

    def __str__(self):
        return self.title		

# values_list()

  • It is similar to values() except that instead of returning dictionaries, 'values_list' returns tuples when iterated over. Each tuple contains the value from the respective field passed into the values_list() call so the first item is the first field, etc.

For example:
  1. # fetch single column data

  2. Posts.objects.values_list('id',)

  3.  

  4. # fetch more than one column data

  5. Posts.objects.values_list('id', 'title',)

  6.  

  7. # You can also fetch in order_by

  8. Posts.objects.values_list('id', 'title',).order_by('?')

Note : You can also pass in a flat parameter if you only pass in a single field, It will either return true/false.

# If flat=True, this will mean the returned results are single values, rather than one-tuples.

Let's look at an example to make the difference clear:

  1. # Without flat=True

  2. Posts.objects.values_list('id')

  3.  

  4. ______________ OUTPUT ______________

  5. [(1,), (2,), (3,), ...]

  6.  

  7. # Without flat=True

  8. Posts.objects.values_list('id', flat=True)

  9.  

  10. ______________ OUTPUT ______________

  11. [1, 2, 3, ...]

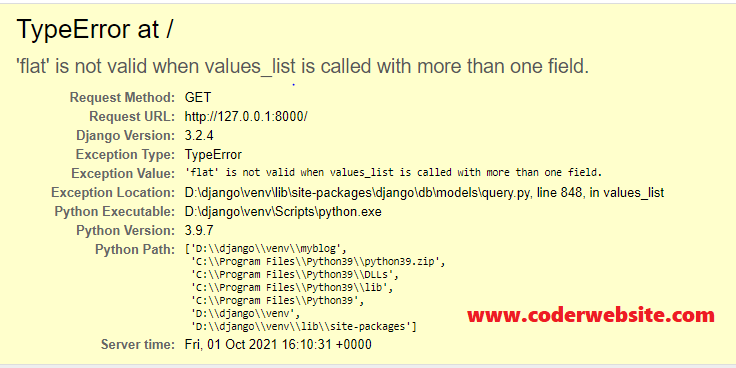
# values_list raise an error to pass in flat when there is more than one field. For example:

  • Posts.objects.values_list('id', 'title', flat=True)

Output:
Django values_list querysets

Important point's of values_list() method:

  • If you don’t pass any values to values_list(), it will return all the fields in the model, in the order they were declared.

  • values_list method returns a ValuesListQuerySet and this class behaves like a list. Most of the time this is enough, but if you require an actual Python list object, you can simply call list() on it, which will evaluate the queryset.

  • A common requirement is to get the specific field value of a certain model instance, to get this, use value_list() and then call the get() method.

  • # Code

  • Posts.objects.values_list('title', flat=True).get(pk=1)

  •  

  • # Output

  • 'First entry'

Recommended Posts:
django Django QuerySet
Read more
Ankaj Gupta
July 18, 2021
Java program to find and print all special characters with their positions in a string

Program to find special characters in a string

In this section, you will learn how to find special characters from a string in Java along with counting the total number of special characters with their positions in a given string.

Java program to find special characters in a string

Let's try to create a simple example :

  ➤ Example : FindSpecialChar.java;

  1. import java.util.regex.Matcher;
    import java.util.regex.Pattern;
    import java.util.Scanner;

    class FindSpecialCharactetrs {
    public static void main(String args[]) {
    Scanner input = new Scanner(System.in);
    String str;

    System.out.print("\nEnter a string : ");
    str = input.nextLine();

    Pattern string_patterns = Pattern.compile("[^a-z0-9 ]", Pattern.CASE_INSENSITIVE);
    Matcher string_matcher = string_patterns.matcher(str);

    System.out.println("\n\n\t______________ OUTPUT ______________");
    System.out.println("\nYour string is : "+str);

    int count = 0;
    while(string_matcher.find()) {
    count = count + 1;
    System.out.println("\tposition "+string_matcher.start() +": "+ str.charAt(string_matcher.start()));
    }
    System.out.println("\nThere are "+count+" special characters");
    System.out.println("\n\t------------------------------------");
    }
    }
 import java.util.regex.Matcher;
import java.util.regex.Pattern;
import java.util.Scanner;

class FindSpecialCharactetrs {

    public static void main(String args[]) {
        Scanner input = new Scanner(System.in);  
        String str;

        System.out.print("\nEnter a string : ");
        str = input.nextLine(); 

        Pattern string_patterns = Pattern.compile("[^a-z0-9 ]", Pattern.CASE_INSENSITIVE);  
        Matcher string_matcher = string_patterns.matcher(str);  

        System.out.println("\n\n\t______________ OUTPUT ______________");
        System.out.println("\nYour string is : "+str);

        int count = 0;

        while(string_matcher.find()) {
            count = count + 1;
            System.out.println("\tposition "+string_matcher.start() +": "+ str.charAt(string_matcher.start()));
        }

        System.out.println("\nThere are "+count+" special characters");
        System.out.println("\n\t------------------------------------");

    }
}
 
Output 1:
  • Enter a string : `Welcome to #coderwebsite && "j@v@" is @m@zing programming l@ngu@ge`!

  •  

  • ______________ OUTPUT ______________

  • Your string is : `Welcome to #coderwebsite && "j@v@" is @m@zing programming l@ngu@ge`!

  •   position 0: `

  •   position 12: #

  •   position 26: &

  •   position 27: &

  •   position 29: "

  •   position 31: @

  •   position 33: @

  •   position 34: "

  •   position 39: @

  •   position 41: @

  •   position 60: @

  •   position 64: @

  •   position 67: `

  •   position 68: !

  • There are 14 special characters

  • ------------------------------------

Output 2:
  • Enter a string : Welcome to coderwebsite

  •  

  • ______________ OUTPUT ______________

  •  

  • Your string is : Welcome to coderwebsite

  • There are 0 special characters

  • ------------------------------------

Recommended Posts:
Java program Java programming
Read more
Ankaj Gupta
July 18, 2021
How to find special characters in a string in java | Java program to check and get special characters in a String

Program to find special characters in a string

In this section, you will learn how to find special characters from a string in Java along with counting the total number of special characters in a given string.

Java program to find special characters in a string

Let's try to create a simple example :

  ➤ Example : FindSpecialChar.java;

  1. import java.util.Scanner;

    class FindSpecialCharactetrs {
    public static void main(String args[]) {
    Scanner input = new Scanner(System.in);

    String str;
    char find_special_charactetr[] = new char[1000];

    System.out.print("\nEnter a string :");
    str = input.nextLine();

    int p, special_charactetr= 0;
    char a[] = str.toCharArray();
    int len = a.length;


    for(int i = 0; i<len; i++){
    p = a[i];
    if (p >= 65 && p <= 90 || p >= 97 && p <= 122 || p == 32 || p >= 48 && p <= 57) {
    continue;
    } else {
    find_special_charactetr[special_charactetr] = a[i];
    special_charactetr++;
    }
    }

    if (special_charactetr > 0){
    System.out.println("\n\n\t______________ OUTPUT ______________");
    System.out.println("\nSpecial characters is :"+String.valueOf(find_special_charactetr));
    System.out.println("There are "+special_charactetr+" special characters");
    System.out.println("\n\t------------------------------------");
    } else {
    System.out.println("\n\n\t______________ OUTPUT ______________");
    System.out.println("\n Note that : No any special characters in : {"+str+"}");
    System.out.println("\n\t------------------------------------");
    }
    }
    }

 import java.util.Scanner;

class FindSpecialCharactetrs {
    public static void main(String args[]) {
        Scanner input = new Scanner(System.in);  
        String str;
        char find_special_charactetr[] = new char[150];  

        System.out.print("\nEnter a string : ");
        str = input.nextLine(); 

        int p, special_charactetr = 0;
        char a[] = str.toCharArray();
        
        int len = a.length;

        for (int i = 0; i < len; i++) {
            p = a[i];
            if (p >= 65 && p <= 90 || p >= 97 && p <= 122 || p == 32 || p >= 48 && p <= 57) {
                continue;
            } else {
                find_special_charactetr[special_charactetr] = a[i];
                special_charactetr++;
            }
        }


        if (special_charactetr > 0) {
            System.out.println("\n\n\t______________ OUTPUT ______________");
            System.out.println("\nSpecial characters is :" + String.valueOf(find_special_charactetr));
            System.out.println("There are " + special_charactetr + " special characters");
            System.out.println("\n\t------------------------------------");
            System.out.println("\n###### Thanks For Visit 'www.coderwebsite.com' aa####### ");
            
        } else {        
            System.out.println("\n\n\t______________ OUTPUT ______________");
            System.out.println("\n Note that : No any special characters in : {"+str+"}");
            System.out.println("\n\t------------------------------------");
            System.out.println("\n###### Thanks For Visit 'www.coderwebsite.com' ####### ");
        }

    }
}
Output 1:
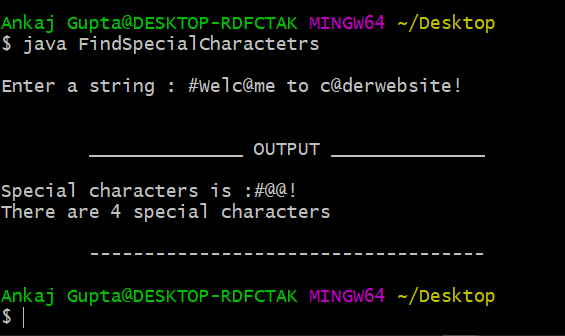
  • Enter a string : #Welc@me t@ c@derwebsite!

  •  

  • ______________ OUTPUT ______________

  •  

  • Special characters is ::#@@@!

  • There are 5 special characters

  • ------------------------------------

Output 2:
  • Enter a string : Welcome to coderwebsite

  •  

  • ______________ OUTPUT ______________

  •  

  • Note that : No any special characters in : {Welcome to coderwebsite}

  • ------------------------------------

Recommended Posts:
Java program Java programming
Read more
Ankaj Gupta
July 09, 2021
How to store emoji expressions in django mysql | Solve the problem of failure to store emoji expressions in django

# Common problem

The error information of storing emoji expressions in table intelligence in django + mysql is:

In Django, django.db.utils.OperationalError: (1366, "Incorrect string value: '\\xF0\\x9F\\x90\\xA6 \\xF0...' for column 'description' at row 1").

# Reason

UTF-8 encoding may be two, three, or four bytes, Emoji expressions are 4-bytes, and MySql utf8 encoding is up to 3-bytes, so the data can't be inserted.

# Solution :

Convert Mysql encoding from utf8 to utf8mb4. The detailed description is as follow steps:

# Settings in MySql:

Step 1 : Modify the character set of the database:

  • ALTER DATABASE database_name CHARACTER SET = utf8mb4 COLLATE = utf8mb4_unicode_ci;

Step 2 : Use the database that currently needs character set modification:

  • use database_name;

Step 3 : Modify the character set of the table:

  • ALTER TABLE table_name CONVERT TO CHARACTER SET utf8mb4 COLLATE utf8mb4_unicode_ci;

Step 4 : Modify the character set of the column:

  • ALTER TABLE table_name CHANGE field_name  VARCHAR(191) CHARACTER SET utf8mb4 COLLATE utf8mb4_unicode_ci;

# Settings in django:

Step 5 : And finally, modify the code in settings.py as follows:

 ➤ Code: settings.py (MySql)

  1. DATABASES = {
    'default': {
    ...,
    # other settings
    'OPTIONS':{
    'charset': 'utf8mb4', # support emoji
    }
    }
    }


    """ DATABASES={
    'default':{
    'ENGINE' : 'django.db.backends.mysql',
    'NAME' : 'your-db-name',
    'USER' : 'user_name',
    'PASSWORD' : 'your-db-password',
    'HOST' : 'localhost',
    'PORT' : '3306',
    'OPTIONS' : {
    'charset : 'utf8mb4',
    }
    } """
django django and mysql
Read more
Ankaj Gupta
May 02, 2021
How to remove ? m=1 or ?m=0 from blogger post URL

# Remove m=1 From URL of Blogger post

A Common search term that every blogger search is How to ?m=1 or?m=0 from blogger Post URL. We all know that "simplicity is beauty" and you want to clean permalink. So, in this article, I will guide you on how to remove ?m=1 from the blogger URL, and make a simple professional URL.

Follow the few steps below and removed ?m=1 from the URL of your blogger post.

Step 1 : First, you login into your blogger's dashboard and then select your blog.

how to remove m1 from blogger url

Step 2 : Click on the Theme option.

Fix Blogger m=1 Duplicate Content Issue

Step 3 : Click on the customise

Remove ?m=1, ?m=0 suffix when visiting from mobile

Step 4 : Click on Edit HTML option.

How to Remove ?m=1 From Website URL On Mobile

Step 5 : Press (CTRL + F) from the keyboard and type "/head" and then search. (If you are not understanding, see the below photo)

New Blogger Easily Remove ?m=1 from Your Website with code

Step 6 : Now paste the below code just above the </head> tag.

How to remove ? m=1 from URL in blogger

let's see code :

  ➤ Code : mycode.js;

<script type='text/javascript' >
    //<![CDATA[
var uri = window.location.toString();
if (uri.indexOf("%3D","%3D") > 0) {
var clean_uri = uri.substring(0, uri.indexOf("%3D"));
window.history.replaceState({}, document.title, clean_uri);
}
var uri = window.location.toString();
if (uri.indexOf("%3D%3D","%3D%3D") > 0) {
var clean_uri = uri.substring(0, uri.indexOf("%3D%3D"));
window.history.replaceState({}, document.title, clean_uri);
}
var uri = window.location.toString();
if (uri.indexOf("&m=1","&m=1") > 0) {
var clean_uri = uri.substring(0, uri.indexOf("&m=1"));
window.history.replaceState({}, document.title, clean_uri);
}
var uri = window.location.toString();
if (uri.indexOf("?m=1","?m=1") > 0) {
var clean_uri = uri.substring(0, uri.indexOf("?m=1"));
window.history.replaceState({}, document.title, clean_uri);
}
//]]>
</script>

Step 7 : Finally Click on Save icon to save your settings and code.

Removing ?m=1 From Blogger

Just save and go to mobile and check the permalink / URL of your blogger post. You will see that "M = 1" has been removed. Now enjoy without "m=1 or m=0" URL, Happy Blogging :)

Benefits Of Removing ?m=1 and ?m=0 :

  • Gives Professional Permalink to your Blog Posts.

  • Helps in the Better ranking is Search Engine Result Pages.

  • Make your Blog Post URL Short.

Recommended Posts:
Blogger blogging
Read more
Ankaj Gupta
April 13, 2021
How to connecting PostgreSQL with a Django application
django connect with PostgresSQL

In this article, you will learn how to connect to a postgreSQL database to a Python web application framework Django. You will also learn how to edit your Django Project Settings file and connect your web application to a PostgreSQL Database.

After walking through the Django installation process it shows how to get started creating a simple Django application.

Connecting your Django App to a PostgreSQL Database

# Introduction:

Django is a flexible framework for quickly creating Python applications. By default, Django applications are configured to store data into a lightweight SQLite database file. While this works well under some loads, a more traditional DBMS can improve performance in production.

Let's see, How to use a postgres database in Django app :

Step 1 : When you open the pgadmin panel you will view a server icon in the navigation at the left side of the window. Click on it to open the databases icon. Right Click on the databases icon to create a new database and fill the prerequisites for creating the database.

Step 2 : Next we need to install an adapter for connecting our database with the Django App. We will be using "psycopg2" for this purpose.

  • pip install psycopg2

Step 3 : Now go-to the "settings.py" file of the Django App and Under the settings file for Databases, change the settings from sqlite3 or your current database to the following code.

 ➤ Code: settings.py (sqlite3)

  • DATABASES={

  •   'default':{

  • 'ENGINE': 'django.db.backends.sqlite3',

  • 'NAME': os.path.join(BASE_DIR, 'db.sqlite3'),

  •   }

  • }

 ➤ Code: settings.py (postgresql)

  1. DATABASES={

  2.   'default':{

  3. 'ENGINE': 'django.db.backends.postgresql_psycopg2',

  4. 'NAME': 'your-db-name',

  5. 'USER': 'user_name',

  6. 'PASSWORD': 'your-db-password',

  7. 'HOST': 'localhost',

  8. 'PORT': '5432',

  9.   }

  10. }

Step 4 : Now run makemigrations command to convert all the models into queries for the database.

  • pip manage.py makemigrations

Step 5 : And finally run migrate command to migrate these changes into our database.

  • pip manage.py migrate

Servers>PostgreSQL>Databases>DB_Name>Schema>Public>Tables

You can go to the pgAdmin panel to check the changes on the database that you have just made in the form of tables that are visible in the following column.

Note that: To install psycopg2 adapter, We will also need to install pillow in case we wish to save any pictures in our database. This can be done using. Have fun!

  • pip install pillow

django PostgreSQL
Read more
Ankaj Gupta
March 29, 2021
Django not able to find static files[Solved]

# Django static files not working

In this article, you will learn how to fix the problem of not loading static files. This is the easiest and safest solution.

In the new version of Django 3.1 and above the settings.py file uses PATH instead of OS to deal with the directory structure. So all the code, we wrote for our static dirs and things like that will no longer work unless we import os at the top of our settings.py file..

Note : This article related to DEBUG = True , if you have problems with DEBUG = False then you can follow this article; Static files not working when DEGUB= False. Have fun!

Let's follow a few steps and, solve the problem of not loading Django static files:

Step 1 : Check that "BASE_DIR" is defined in your project settings.py , if not then define it

 ➤ Code: settings.py

  • import os

  • BASE_DIR = os.path.dirname(os.path.dirname(os.path.abspath(__file__)))

Step 2 : check debug mode in settings.py.

 ➤ Code: settings.py

  • STATIC_URL = True

  • ALLOWED_HOSTS = []

Step 3 : Define a STATIC_URL and STATICFILES_DIRS in settings.py.

 ➤ Code: settings.py

  • For recent releases of Django, You have to configure static files in settings.py as,

  1. STATIC_URL = '/static/' # the path in url

  2.   

  3. STATICFILES_DIRS = [os.path.join(BASE_DIR, 'static')]

Step 4 : In your templates, For access to static files. use the static template tag to build the URL for the given relative path

  • Store your static files in a folder called static in your app For example my_app/static/image/example.jpg.

 ➤ Code: home.html

  • After that, create the static folder at the root directory of your project.

  • To load the static files on templates use:

  1. {% load static %}

  2. <!DOCTYPE html>

  3. <html>

  4. <head>

  5. <title>Welcome! to coderwebsite</title>

  6. <link rel= "stylesheet"href= "{% static 'css/coderwebsite.css' %}" type= "text/css">

  7. <script type= "text/javascript"href= "{% static 'js/coderwebsite.js' %}"></script>

  8. </head>

  9. <body>

  10. <h1>My Django project</h1>

  11. <img height="50" width="100" src="{%static 'images/coderwebsite.png' %}" alt="logo"/>

  12. </body>

  13. </html>

Step 3 : Now finally, you can run your django project.

  • python manage.py runserver

Note : Congratulations, now static files will be loaded in your Django project!

django django static files
Read more
Ankaj Gupta
March 25, 2021
Django static files not working when debug false || debug true
Django static not working when debug is false

# Django static and media files not working when debug is false

In this article you will learn how to fix problem of not loading static files and media in Django even the DEBUG is FALSE. This is the easiest and safest solution.

# Problem:

Django static and media files not working when debug is false

 ➤ Code: settings.py

  • DEBUG = False #True

  • ALLOWED_HOSTS = ['*'] #Host name

# Problem Fix:

Let's see, How you can fix the problem of Django static and media files not working when DEBUB = False :

1.)First way: devserver in insecure mode

If you still need to server static locally (e.g. for testing without debug) you can run devserver in insecure mode:

  • python manage.py runserver --insecure

--insecure: it means you can run server without security mode.

Note: This is Exactly you must type on terminal to run your project without "DEBUG = TRUE" and then you see all assets (static) file is loading correctly On local server.

2.)Second way: devserver in secure mode

Step 1 : Define a STATIC_ROOT and MEDIA_ROOT path in settings.py.

 ➤ Code: settings.py

  1. STATIC_URL = '/static/'
    MEDIA_URL = '/media/'

    if DEBUG:
    STATICFILES_DIRS = [os.path.join(BASE_DIR, 'static')]
    else:
    STATIC_ROOT = os.path.join(BASE_DIR, 'static')

    MEDIA_ROOT = os.path.join(BASE_DIR, 'media')

Step 2 : Now define your URLConf that if static is in the beginning of url, access files from the static folder staticfiles.

 ➤ Code: urls.py

  1. from django.conf.urls import url
    from django.conf import settings
    from django.views.static import serve

    urlpatterns = [
    url(r'^media/(?P<path>.*)$', serve, {'document_root': settings.MEDIA_ROOT}),
    url(r'^static/(?P<path>.*)$', serve, {'document_root': settings.STATIC_ROOT}),
    ]

Note: This is your project's urls.py file.

Step 3 : Now you can run your django project.

  • python manage.py runserver

Note : Congratulations, now static and media files will be loaded in your Django project when DEBGU = False. Have fun!

django django static files
Read more
Ankaj Gupta
March 23, 2021
How to find out nth value by using array in Java | java code examples with output
single level inheritance

# Java program to find out n'th value by using array

In this section, You will learn how to find out nth value by using array in Java.

Let's try to create a simple example :

  ➤ Example : student.java;

  1. import java.io.*;

  2. import java.util.Scanner;

  3. public class FindElement {

  4.   public static void main(String args[]) {

  5. int[] arr = {5, 10, 15, 20, 23};

  6.   

  7. Scanner input = new Scanner(System.in);

  8. System.out.print("Enter the nth position: ");

  9. int num = input.nextInt();

  10.   

  11. if(num <= arr.length){

  12.   int element = arr[num-1];

  13.   System.out.println("Element is : "+element);

  14. }

  15. else{

  16.   System.out.print("Enter any position upto "+arr.length);

  17. }

  18.   }

  19. }

Output :
  • Enter the nth position: 10

  • Enter any position upto 5


  • ---------------------------------------------------------------------

  • Enter the nth position: 4

  • Element is : 20

Recommended Posts:
Java program Java programming
Read more
Ankaj Gupta
March 23, 2021
Differences between STATICFILES_DIR, STATIC_ROOT and MEDIA_ROOT

# Differences between STATICFILES_DIR, STATIC_ROOT and MEDIA_ROOT

To understand the difference, it is necessary to figure out what these three constants are for.

In this article, You will learn about STATICFILES_DIR, STATIC_ROOT and MEDIA_ROOT.

1.) STATICFILES_DIRS :

Need to be used in the development mode. Static files are usually placed in two places:

  • The static directory under each app.

  • The static directory under the project root directory (because some static files are not unique to an app).

  • # BASE_DIR is the absolute address of the project

  • STATIC_ROOT = os.path.join(BASE_DIR, 'xxxxxx')

STATICFILES_DIRS tells django to first look for static files in STATICFILES_DIRS, and then go to the static folder of each app.

Note : django finds static files as lazy lookups. When you find the first one, it stops looking up.

2.) STATIC_ROOT :

  • # BASE_DIR is the absolute address of the project

  • STATIC_ROOT = os.path.join(BASE_DIR, 'xxxxxx')

This constant is not used in development mode and will be used during deployment.

Python manage.py collectstatic when deploying, django will copy the static files of all apps to the STATIC_ROOT folder.

3.) STATIC_URL :

Django uses STATIC_URL to give browsers direct access to static files

  • STATIC_URL = '/static/'

So if your project root / static / there is a 123.png image.

Then you can go directly through the browserhttp://IP: port number / static / 123.png to access your picture

django django static files
Read more
Ankaj Gupta
March 20, 2021
the pgadmin4 server could not contacted
the pgadmin4 server could not be contacted

#The application server could not be contacted (Embedded PostgreSQL)

Note : After upgrading the embedded PostgreSQL database version from 9.4.22 to 10.9 in version 2019.11, pgAdmin4 fails to lanuch on Linux platform with the following error: The application server could not be contacted.

Cause

Compared to pgAdmin3 included in PostgreSQL database version 9.4.22, pdAdmin4 included in PostgreSQL database version 10.9 is a different client executable file, which could not be executed on Linux platform,

#Solution

To enable launching the new pdAdmin4 client, a startup script was added, which then requires users to run the script in order to access the client.

Data Flow Probe

To access the client of the embedded PostgreSQL database (version 10 or later), do the following:

  1. Run the following command to start the pgAdmin4 client:

    • $UCMDB_HOME/pgsql/pgAdmin 4/bin/start_pgadmin4.sh

  2. Follow the on-screen instructions and access the local web browser using URL: http://127.0.0.1:5050.

  3. Log in to the client

UCMDB server:

To access the client of the embedded PostgreSQL database (version 10 or later), do the following:

  1. Run the following command to start the pgAdmin4 client:

    • $DATAFLOW_PROBE_HOME/pgsql/pgAdmin 4/bin/start_pgadmin4.sh

  2. Follow the on-screen instructions and access the local web browser using URL: http://127.0.0.1:5050.

  3. Log in to the client

PostgreSQL
Read more
Ankaj Gupta
January 01, 2021
How to connect MongoDB with Django

In this article, you will learn how to connect to a MongoDB database to a Python web application framework Django. You will also learn how to edit your Django Project Settings file and connect your web application to a mongodb (NoSQL or document) Database.

Django is a flexible framework for quickly creating Python applications. By default, Django applications are configured to store data into a lightweight SQLite database file.

how to connect django with mongodb

Connecting your Django App to a MongoDB database

# Introduction:

Django is used in such an amazing modular style, It’s simple to replace different components of a Django-based web application. Because document(NoSQL) databases are more common these days, you might want to try running an application with a different back end rather than one of the standard relational databases such as MySQL, SQLite, PostgreSQL or etc.

3 Ways To Connect Django With MongoDB:

  1. Djongo.

  2. MongoEngine.

  3. PyMongo.


1.) Djongo

Dongo is an open-source project and regularly maintained.

Djongo is a smarter approach to pymongo programming. It is an extension to the traditional Django ORM framework. It maps python objects to MongoDB documents, a technique popularly referred to as Object Document Mapping or ODM.

# Let's start connecting "Django" with "MongoDB" using djongo

Step 1 : To set up the environment for Djongo, you first need to install the package.

  • pip install djongo

Step 2 : Now go-to the "settings.py" file of the Django App and Under the settings file for Databases, change the settings from sqlite3 or your current database to the following code.

  • DATABASES={

  •   'default':{

  • 'ENGINE': 'djongo',

  • 'NAME': 'your-db-name',

  • 'CLIENT': {

  •   'host':'localhost',

  •   'port': 27017,

  •   'username': '',

  •   'password': ''

  • }

  •   }

  • }

Step 3 : Now run makemigrations command to convert all the models into queries for the database.

  • python manage.py makemigrations

Step 4 : And finally run migrate command to migrate these changes into our database.

  • python manage.py migrate

Note : Congratulations, your Django project is now connected with MongoDB. Have fun!

Requirements
  1. Python 3.6 or higher

  2. MongoDB 3.4 or higher

  3. If your models use nested queries or sub querysets like this:

  • inner_query = Blog.objects.filter(name__contains='Ch').values('name')

  • entries = Entry.objects.filter(blog__name__in=inner_query)

Then, MongoDB 3.6 or higher is required.

Note that: Django does't create a MongoDB database. So you must have a pre-made MongoDB database, if not, then you create a new database in Mongodb, Then Djongo helps to connect to that database and acts as a transpiler from SQL to MongoDB.


2.) MongoEngine

MongoEngine is an ORM (object relation mapping) layer on the top of PyMongo written in python. Using MongoEngine will grant you additional benefits like fields DictFieldand ListField which you will see very useful when dealing with unstructured JSON data in MongoDB.

# Let's start connecting "Django" with "MongoDB" using MongoEngine

Step 1 : To set up the environment for Djongo, you first need to install the package.

  • python -m pip install -U mongoengine

Step 2 : After that, open your project "settings.py", and change the DATABASES part to this code.

  1. # DATABASES={

  2. #   'default':{

  3. #    'ENGINE': 'django.db.backends.sqlite3',

  4. #    'NAME': os.path.join(BASE_DIR, 'db.sqlite3'),

  5. #   }

  6. # }

  7. import mongoengine

  8. mongoengine.connect(db=DATABASE_NAME, db=DATABASE_HOST, db=USERNAME, db=PASSWORD)

Requirements
  1. MongoDB 3.4, 3.6, 4.0

  2. pymongo>=3.4

  3. If your models use nested queries or sub querysets like this:

Note that: You do not need to do makemigrations and migrate since you are not using Django ORM here.


3.) PyMongo

PyMongo is a Python distribution containing tools for working with MongoDB, PyMongo is the recommended way to work with MongoDB from Python. It is great for writing and saving JSON data to your MongoDB, and it will let you use all of the mongo queries in your python code.

Installation
  • pip install pymongo

  • # To get a specific version of pymongo:

  • python -m pip install pymongo==3.5.1

  • # To upgrade using pip:

  • python -m pip install --upgrade pymongo

Step 2 : After that Installation, create "utils.py" file in your project root directory(project/utils.py) and add these lines.

 ➤ Code: utils.py

  1. from pymongo import MongoClient

  2.   

  3. def get_db_handle(db_name, host, port, username, password):

  4.   client = MongoClient(

  5. host=host,

  6. port=int(port),

  7. username=username,

  8. password = password

  9.   )

  10.   db_handle = client[db_name]

  11.   return db_handle, client

  12.   

  13. def get_collection_handle(db_handle, collection_name):

  14.   return db_handle[collection_name]

  15.   

You can use the above functions in your views or anywhere you want to fetch or write data into your MongoDB.

Note that:

  • you don’t need anything in models when you are using PyMongo.

  • Also, no need to add anything in Settings.py but don’t forget to comment out the DATABASES part.

django django and mongodb
Read more

Discover more amazing content below